REVIEW
Super Mommies & Daddies had a perfectly sweet weekend with the Betty Crocker No-Bake Cheesecake Mix sent for the review. You will also be amazed to note that it was our first-ever cake making attempt with or without baking. Yes, we didn't even know anything about it. Baking would always sound something really difficult, though Betty Crocker Baking and Cake Mixes would always fascinate us. Also, we would usually be concerned about the effort & time it takes to bake the cake. Therefore, when we heard about this newly introduced No-Bake Cheesecake Mix by Betty Crocker, we could not wait for it to get our hands on and in no time we actually gave it our first try! -:)
It's as easy as ABC or 123. You can simply make a bakery delicious cheese cake in just three basic steps.
Inside the box, you will find a Pudding Mix (150g), Biscuit Crumb (110g) and Strawberry OR Blueberry Topping (100g) in three separate packets, also shown above. You will only need Melted Butter (90g) and Cold Milk (400ml), which do not come with the mix.
It is advisable to use the measuring utensils to set aside the required quantities of the above two i.e. milk and butter. Since, we didn't have any so we divided a 500g butter box into 5 parts minus 10g to make it 90g approx. and for the milk, we conveniently used our baby milk bottles to make it exactly 400ml -:). STEP 1 (Blend)
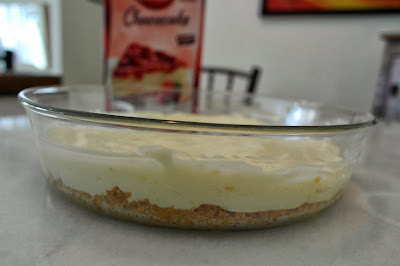
Blend the biscuit crumb with melted butter. Ideally, we should have used an 18cm or a 20cm loose-base round tin as suggested on the recipe but since we didn't have one so we used just a simple glass bowl as you can see below. It's really up to you how you want to do it.
Then, press the biscuit mix with back of the spoon to cover the base of your container and after that refrigerate it for about 15 min or so.
STEP 2 (Beat)
While the above gets ready, you can move on to step 2 i.e. beat the pudding mix with the milk in a large bowl on low speed until moistened and then scrape the bowl and beat on medium speed for a few minutes until it gets thick and creamy.
By the time you are done with the above, your blended mixture of bread crumb and butter would be ready too in the refrigerator.
Now, spread the above beaten mixture of pudding and milk on top of the biscuit base and refrigerate it for at least 2 hours.
STEP 3 (Decorate)
Good news is that the Betty Crocker No-Bake Cheesecake Mix comes with the required fruit toppings too for you to decorate it the way you want to. Just pour it on the top and serve.
Not only this, you can get creative and use the Betty Crocker No-Bake Cheesecake Mix for different recipes including Blueberry/Strawberry Cheesecake Shots or so. You can also make bite-sized delicious deserts too.
HIGHLIGHTS:
1. Convenient, Easy and Quick in 3 simple (Blend, Beat & Decorate) steps.
1. Convenient, Easy and Quick in 3 simple (Blend, Beat & Decorate) steps.
2. No hassle of baking at all.
3. Simply delicious for the kids play dates and parties.
HIGHLY RECOMMENDED!
WHERE TO BUY?
You can find Betty Crocker No-Bake Cheesecake Mix in Strawberry and Blueberry flavours at all Cold Storage outlets, NTUC FairPrice Hypermarts, and NTUC FairPrice Finest outlets and retails.
For more information and recipe ideas:
Note: Information and content from the parent source and respective website. It is for informational purposes only.


11 comments:
I did the cheesecake mix EXACTLY how you have done it. The biscuit crumb mix was yum, but the cheesecake part, after refrigerating it for 2 hours, when I tried to cut the cake, the pudding was just as creamy as before. Its texture had not changed at all, and didn't seem like I was eating a cheesecake. I was not able to cut it in pieces and serve it in a plate. Just had to eat directly from the bowl. What wrong did I do? :/
Actually we followed the instructions with the exact required quantities of ingredients and after refrigeration, we wouldn't say it was not soft but yes we could cut it and it did somewhat tasted like a cheesecake....
Not only did mine not cut like a proper cheesecake, a little while after removing from the fridge, it caved in into the part which was hollow where the slice had been cut (It had not actually been cut, but I had tried to give it shape with the knife as if it had been cut properly, but then it caved in.) :(
Oh no! Well, may be you can try making deep slices if you haven't done so earlier because, we had really thin layered slices and felt it could have been better if there were more layers of custard inside. May be try using a small but deep container...just giving it a though! :)
Problem was that there was nothing like a 'slice'. lol. and the knife did not come out clean. it had the cheesecake mix paste thick stuck in it. so i m not sure what i have done wrong. I used about 350 ml of milk, which it says on the pack, and I chose the blueberry version of this No bake cheesecake. So everything is the same except the sauce is blueberry. I read somewhere that one must use ice-cold chilled milk for the cheesecake mix, or the cheesecake mix wont set. It doesn't say anything on the pack about using really cold milk. Hence I used normal milk at room temperature. Could that have been the reason?
And yes I made it in a deep tin dish. Like a cake.
i made the bluebery cheesecake mi in a 20cm, springform tin. i did exactly what the box said. and it turned out yum. :DDDDd
i made the bluebery cheesecake mi in a 20cm, springform tin. i did exactly what the box said. and it turned out yum. :DDDDd
i did the refrigerating for 12 hours and it came out well and could slice the cake
Post a Comment